Personalise SMS
Our personalised messaging is a powerful feature that enables clients to easily send SMS to their contacts such that each recipient receives a personalised message that has been crafted specifically to apply to him/her. It involves composing a single message template and indicating in parts of the message text where values will be different for each recipient.
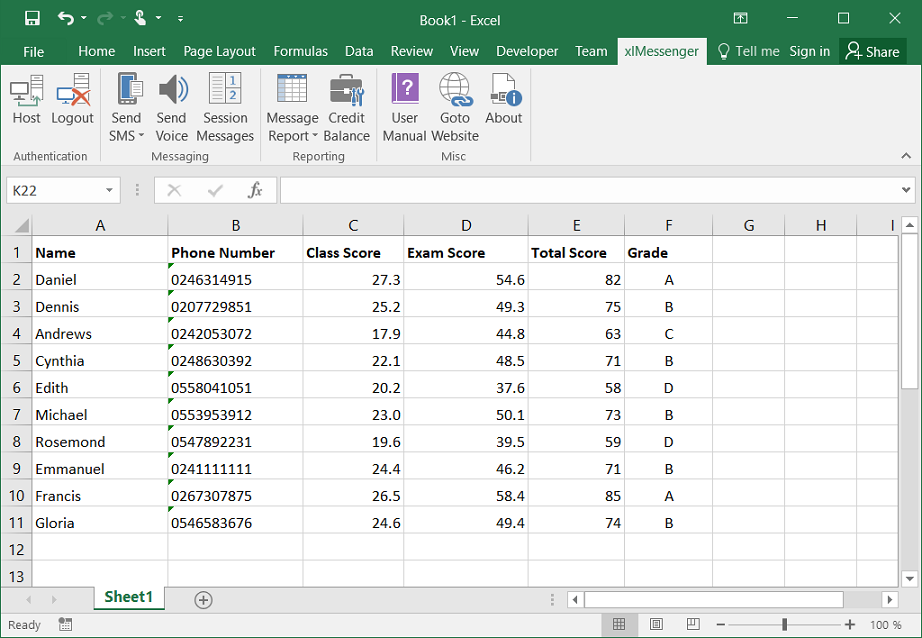
Suppose we need to send messages to students on their total score and grade in an examination. The following image shows an example data in an Excel spreadsheet that can be used for demonstration.
Using our SMS platform, it is very easy to send messages to contacts when values will differ from one contact to another as shown above. The advantage with using our bulk SMS platform is that you do not need to compose several messages for each destination. You only compose a single message template and define variables in parts of the message text where values will be different for each recipient.
Defining Variables
To compose a message template for personalising SMS for each recipient, a variable must be defined in parts of the message text where values will be different for each recipient. A variable is defined by appending a unique name to the dollar sign ($) and enclosing it in opening and closing curly braces. That is:
{$VARIABLE_NAME}
For example, we can compose a single message template which can be used to personalise SMS for each recipient as follows:
Hello {$name}, your score in Economics is {$score} and the grade is {$grade}.
A variable name should be unique in a message. It should begin with a letter or underscore and should not contain any spaces. When there is the need to refer to one column multiple times, you will need to insert different variables that will refer to the same data column.
When a variable is defined in a message text, it informs our messaging application that values will be substituted in place of the variables for each recipient. As seen from the message template, we have defined variables in parts of the message where values will be different for each recipient.
Assigning Values
Once the message has been composed and the variables defined, values can be assigned to the variables for each recipient. This is done when adding recipients to the message. When adding destinations, the variables will be presented to you so that you will select columns from which values will be read for each variable defined in the message. When done, the message can be submitted.
This process of assigning values to the variables is the same when sending personalised messages from the Web Interface or from the Excel Plugin used to send messages directly from Excel.
In the example given, each recipient will separately receive a personalised message as applicable to him or her. The personalised messages that will be generated are shown below:
    Hello Daniel, your score in Economics is 82 and the grade is A.
    Hello Dennis, your score in Economics is 75 and the grade is B.
    Hello Andrews, your score in Economics is 63 and the grade is C.
    Hello Cynthia, your score in Economics is 71 and the grade is B.
    Hello Edith, your score in Economics is 58 and the grade is D.
    Hello Michael, your score in Economics is 73 and the grade is B.
    Hello Rosemond, your score in Economics is 59 and the grade is D.
    Hello Emmanuel, your score in Economics is 71 and the grade is B.
    Hello Francis, your score in Economics is 85 and the grade is A.
    Hello Gloria, your score in Economics is 74 and the grade is B.
As indicated earlier, you only need compose a single message text and define variables in parts of the message text where values will be different for each recipient. When message is submitted, our system will automatically generate customized messages for each destination added to the message before dispatching for delivery.